
Part 7/ 🎨 Latte Art for Beginners: Step-by-Step Guide to Impress Your Friends ☕👩🎨
Table of Contents
✍️ Introduction: Where Coffee Meets Canvas ☕🎨
Latte art isn’t just for baristas behind the café counter — it’s for anyone who loves coffee and creativity. With a little patience and practice, you can turn every homemade latte into a share-worthy work of art. 🌟
Whether you’re entertaining guests or just elevating your morning ritual, this guide walks you through the basics of latte art — from frothing milk to pouring your first heart or rosette. Let’s turn your cup into a canvas! 🖌️
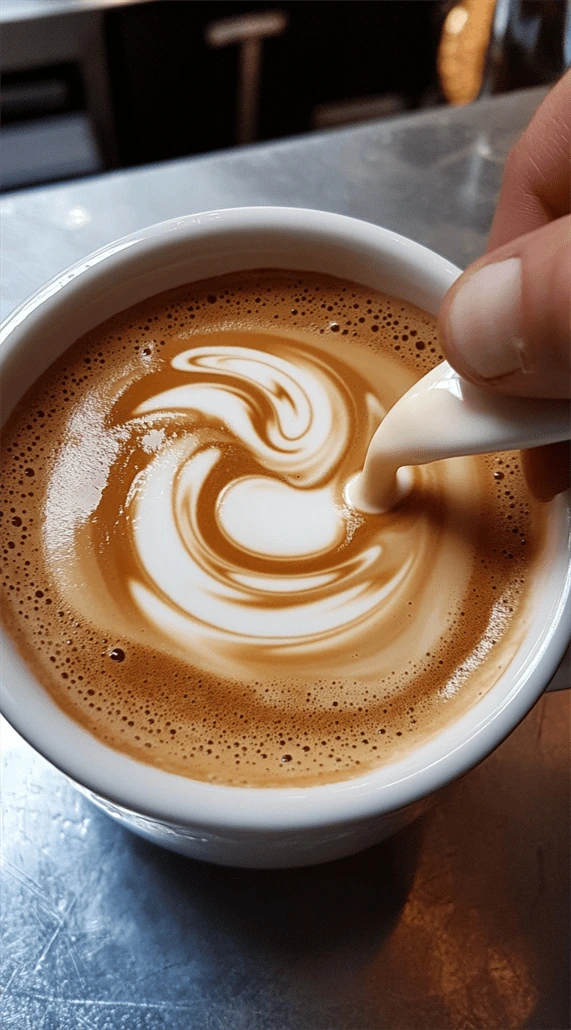
📸 Caption: “A swirl of milk, a stroke of mastery — your latte can be a masterpiece.”
🥛 The Secret Starts with Steamed Milk
Before you can pour art, you need the perfect microfoam. Microfoam is the smooth, velvety milk texture that blends seamlessly with espresso.
✅ How to Steam or Froth Milk at Home:
| Equipment | Method | Best For |
|---|---|---|
| Steam wand | Professional texture | Espresso machines |
| Hand frother | Easy and affordable | Beginners |
| French press | Budget-friendly | Manual frothing |
Tips for perfect microfoam:
- Use cold whole milk (best for texture) 🥶
- Position the frother or steam wand just beneath the milk’s surface to introduce air effectively.
- Swirl your milk afterward to remove bubbles
📸 Caption: “Microfoam is your paint; make it smooth, silky, and glossy.”

☕ Pulling the Perfect Espresso Shot
Latte art relies on a solid espresso foundation. Your shot should have a thick crema — that golden layer of oils and flavor.
Espresso basics:
- Use freshly ground beans (fine grind)
- Aim for a 25–30 second extraction
- Your crema is the “canvas” for the art
🖌️ Step-by-Step: Pouring Your First Latte Art Designs
Now comes the fun part — creating simple yet impressive designs. Start slow, and don’t worry if it’s not perfect at first!
❤️ 1. The Heart
How to Pour:
- Hold your cup at a slight angle.
- Start high and pour slowly to mix milk with espresso.
- Lower the pitcher close to the surface and pour into the center.
- Once you see a white circle, give a little push and lift the pitcher to finish with a sharp cut-through.
Beginner Rating: ⭐⭐
Impress-O-Meter: 💖💯
📸 Caption: “Simple, sweet, and full of heart — the perfect starter design.”
🍃 2. The Rosetta (Fern Leaf)
How to Pour:
- Begin like the heart.
- Wiggle the pitcher back and forth as you move backward.
- Wrap it up with a fast, clean pull through the center to form the stem of your latte art design. 🌿☕
Beginner Rating: ⭐⭐⭐
Impress-O-Meter: 🌿✨
📸 Caption: “One wiggle at a time — the rosetta adds flair to every latte.”
🐻 3. Bonus: Etching Latte Art
Etching uses tools (like a toothpick or latte pen) to draw after pouring.
Design Ideas:
- Smiley faces 😊
- Flowers 🌸
- Cute animals 🐱
Use syrups or cocoa powder for color contrast. This style is more flexible and fun for beginners!
🧠 Common Mistakes and How to Fix Them
| Mistake | Cause | Fix |
|---|---|---|
| Big bubbles in milk | Overheating or too much air | Keep pitcher tilted and lower the wand |
| Art disappears | Milk too thin | Aim for glossy, paint-like texture |
| Milk and espresso don’t blend | Pour too fast | Start high, then come close to the surface |
📸 Caption: “Each slip brings you closer to latte art mastery.” ☕✨
🎨 Latte Art at a Glance
| Skill | Focus | Tools Needed |
|---|---|---|
| Microfoam | Texture | Milk frother or steam wand |
| Espresso | Rich crema | Espresso machine or Moka pot |
| Pouring | Control & precision | Pitcher with spout |
| Design | Heart, Rosetta, Etching | Practice & patience! 🧘 |
☕ Milk Matters: Which Type Is Best?
| Milk Type | Foam Quality | Flavor | Notes |
|---|---|---|---|
| Whole Milk | 🥇 Best | Creamy & rich | Traditional favorite |
| Oat Milk | 🥈 Great | Nutty & sweet | Best plant-based option |
| Almond Milk | Good | Light & nutty | Froth varies by brand |
| Soy Milk | Moderate | Neutral | Can curdle with espresso |
| Skim Milk | Least | Watery | Harder to froth |
📸 Caption: “Choose your milk wisely — it affects your foam and flavor.”
🔄 Practice Makes Perfect
Be patient with yourself. Even the best baristas spill and swirl imperfectly. Try practicing your pours using water and dish soap in a cup to simulate milk foam.
Pro Tips:
- Watch your angles and heights
- Rewatch your pours via video to improve
- Start with wide mugs — more space = better control
🎯 Final Thoughts: Pour with Passion
Latte art is more than a show — it’s a celebration of craft, ritual, and care. Every pour is a chance to share warmth, skill, and creativity in a cup.
So go ahead — froth that milk, steady your hand, and surprise someone (or yourself) with a heart, a leaf, or a whimsical bear. You’ve got this. 🐻☕
📸 Caption: “Latte art isn’t about perfection. It’s about joy in every cup.”